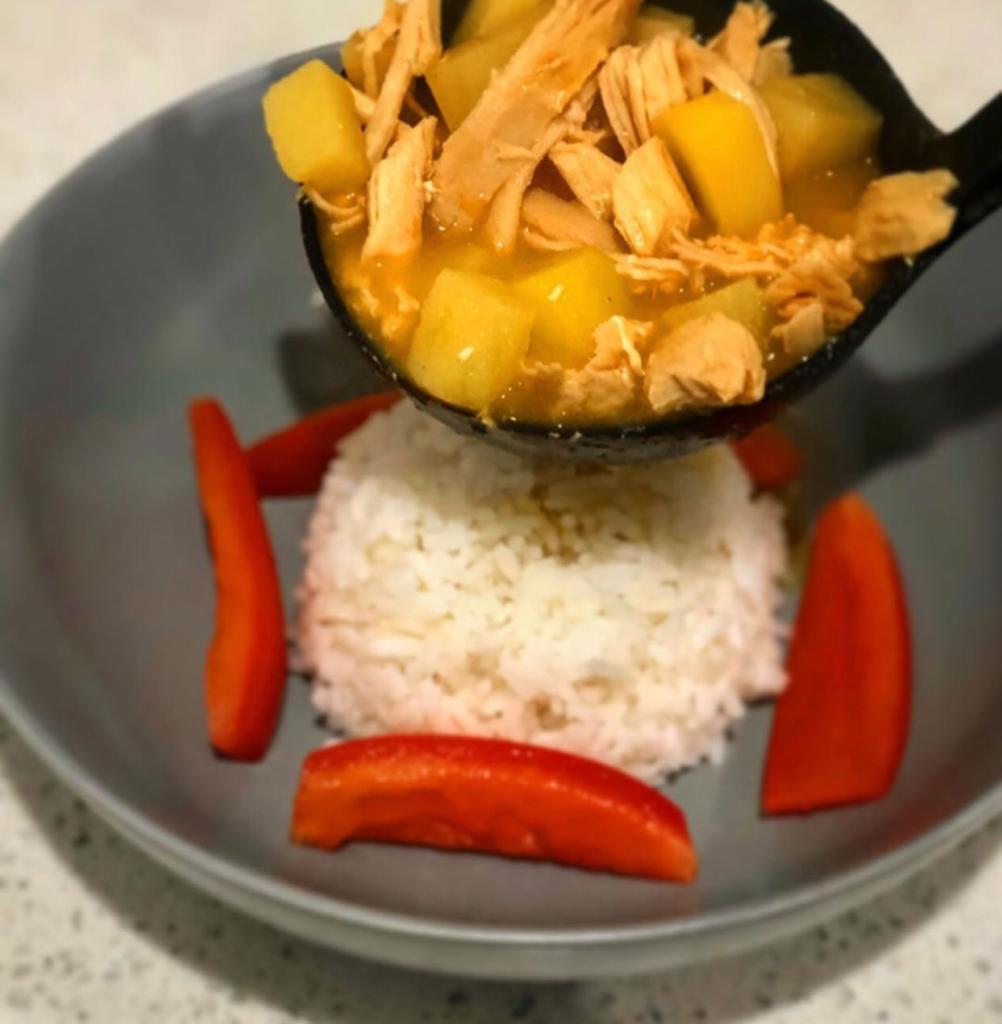
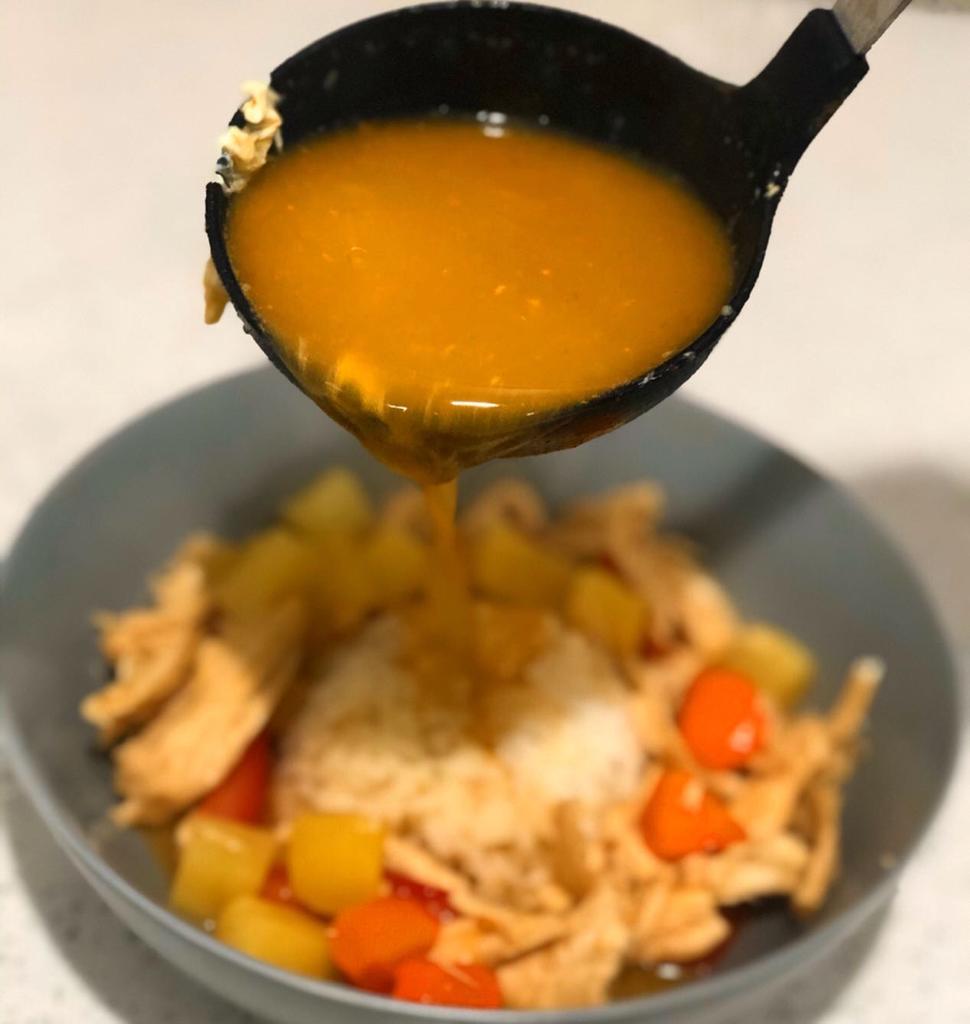
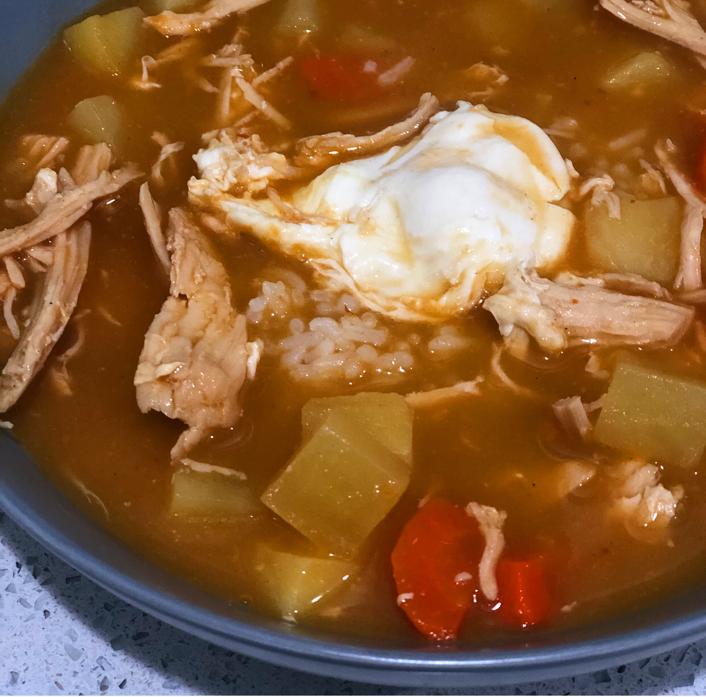
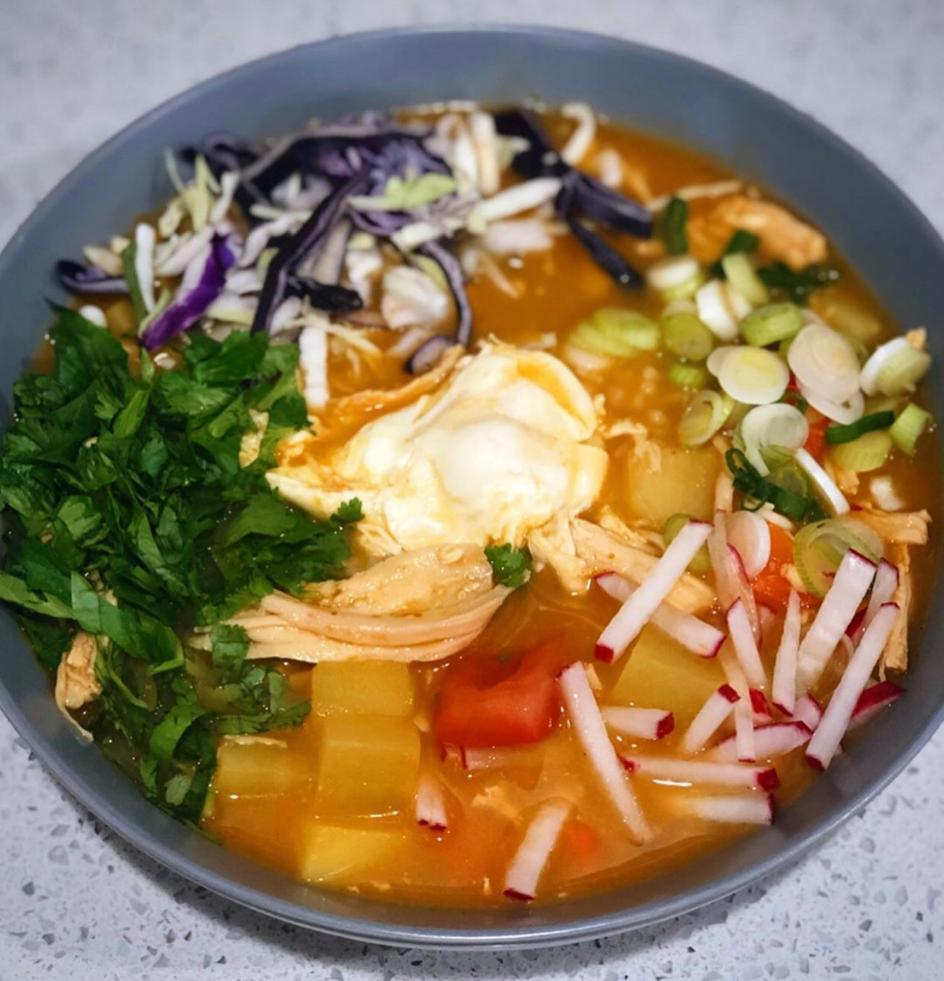
Chicken & Rice Soup Feeling under the weather this season? You're not the only one. I know it's super tempting to load up on all the over the counter medications because you're busy, You don't have time be sick! You have a life, a schedule, and tons of things to do that do not wait for you while you're sick. Whatever your regimen is to kick the sickness, this soup certainly won't hurt! They key is making a flavorful broth that is packed with immune boosting ingredients. From there, you can add any ingredients that you like. I happen to love chicken and rice so I can use that as a base and create any number of delicious soups around that! So take this recipe and make it your own! Use up all those leftover ingredients that are sitting in your fridge. Be proactive with your health and reap the benefits. The keys to this immune boosting broth are simple. I start by sauteing garlic, white onion, fresh ginger and chili flakes in a touch of olive oil. By sauteing these ingredients I open up the aromatic elements and start creating a flavorful base. From there, you can add water or chicken broth along with other aromatic elements to create a stock that we will later use to assemble our soup. Once the broth comes to a boil, add in some chicken breast and allow that to slowly simmer for 20-25 minutes until the chicken is cooked through. Remove the chicken, and strain your stock. Now we're ready to make the soup. IngredientsFor the stock: 3 cloves of garlic, smashed 1 whole white onion, rough chop 1T chili flakes 1T ginger, rough chop 1-2 stalks celery, rough chop 1-2 each carrots, peeled 1T black peppercorns stalks of parsley or cilantro 2-3 chicken breast 1 QT water or store bought chicken broth Salt to taste For the soup 1/2 lb yukon potatoes, medium dice 1/2 lb carrots, medium dice cooked white rice 1-2 roma tomatoes, quartered and de-seeded 3 corn tortillas, lightly charred 1 T red pepper paste (mild or spicy) reserved chicken, shredded Salt, pepper, cumin to taste For Garnish cilantro cabbage radish green onion poached egg Method
1 Comment
Yield: 2 portions Salchi-Papas translates into something very complex. Get ready. [Salchicha: meaning sausage & Papas: meaning potatoes] Can you wrap your head around that?! Okay, so this dish is one of those that you find different versions of in many cultures. This particular preparation is inspired from my time working in a Peruvian restaurant that at the time, was like my family. I spent some time in Peru and ate dishes just like this. If you know me, you know that I love simplicity! Peruvian flavors are just that, simplistic with a focus on execution of said simple ingredients. Normally, the potatoes and sausage (hot dog) are fried. In this version I have seared the hot dogs in a hot dry pan and have oven baked the potatoes in a way that comes out super crispy on the outside as well as soft and creamy on the inside. Top it all off with a fried egg and drizzle with your favorite sauce. Now, let's talk about how to achieve the perfect oven baked "french fry." If you refer back to an earlier blog of mine, titled "The Humble Potato" you will see how I par-cook (partially cook) the potatoes before roasting them in the oven. We are going to use that same principle here. First things first, what type of potato should you use? In my opinion, the Yukon Gold potato is the best choice. The Yukon potato is a moderately starchy and moist potato that lends itself very well to pretty much everything, plus the skin is so thin that you don't even need to peel them! Potatoes like russets, for example, would be an okay choice because of their high starch content which will yield a crispy exterior but their low-moisture content might pose a problem when it comes to keeping their structural integrity (especially when par-cooking). Okay, I'm done boring you about potatoes, just know that a Yukon Gold is kind of an all purpose potato that works great in this recipe. By par-cooking the potatoes first, you start the process of cooking the inside without crisping the outside. Then, later, when we cook the potatoes in the oven, on a high heat, the outside can achieve ultimate crispiness while the inside basically turns into mash potato. Brilliant! Check out the recipe below and let me know how your's comes out in the comments section! Ingredients1 lb Yukon Gold Potatoes, scrubbed clean, sliced into 1/2" to 1/4" fries 2 Kosher beef hot dog's, sliced on a bias 2 Eggs 1/4 c Olive oil Sauces of your choice* (see note) Salt & Pepper to taste Method
Notes:
*In this recipe I have made two Peruvian sauces, both relatively spicy. I did not include those recipes here but feel free to send me an email if you'd like to learn more. Otherwise, you can mix together mayonnaise and your favorite hot sauce to create a sauce to drizzle on top. You can also combine mayonnaise and lime juice for a less spicy and flavorful alternative. **It's important that the potatoes are spaced out and not over crowded to allow for proper crisping. If the potatoes are too close together and overlapping they will create steam and you will not achieve the crispy potato goodness you seek. This technique is universal in most cases when cooking. Allowing proper space provides ample surface area and heat distribution to achieve browning. Crowding a pan will always create steam and make it very difficult to achieve browning and instead result in stewing and the release of moisture. Yield: 4 portions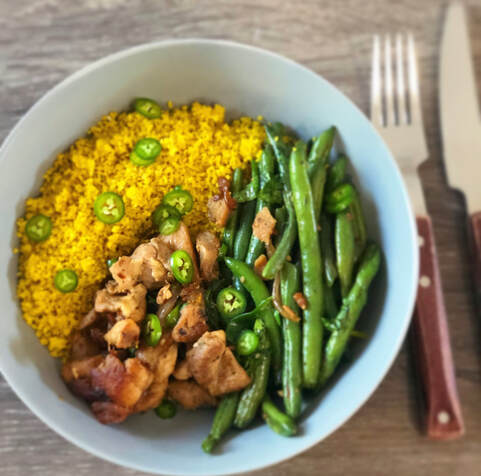 If you are like me, you want to eat well and treat your body well. You want to be healthy and make choices to support that goal. But if you're like me you may have struggle to maintain this lifestyle because, well, you just love food! Listen, I love indulgent foods as much as anyone else. Pizza, fries, burgers, pasta, I love it all! And I refuse to restrict myself from enjoying the things that make me happy. The mistake is thinking that you can't have both. So, how am I able to maintain my health goals while still enjoying the foods that are less nutrient dense? It's called moderation! Yes, it's a buzz word that we have all heard. But how well do you practice it? The trick lies in what you do around those unhealthy meals. Do you eat well and exercise around your less than healthy food choices? That's right, I said choices! You get to make them. So if you know you want to enjoy an indulgent meal or a night out, prepare for that by making sure the meals you eat and activities you engage in around that meal support your long term goals. The key is to prepare meals for yourself that are healthy, balanced and satisfying on a regular basis so that you will be better equipped to control your cravings. We all have only so much willpower to expend every day. Like anything else, you must practice will power to develop it as a skill. So try this: For every unhealthy meal you consume, try to eat 3 healthy ones. This is trick that I have used that has helped me to develop my discipline, to make healthier choices more often, and still be able to indulge in the foods that make my soul happy. And I don't have to waste time or precious energy feeling guilty because I know I've earned it and I know I will make it up. Start small. Once this 3:1 rule becomes a habit then you can challenge yourself by adding more healthy meals in between unhealthy ones. Give it a try for a week and see if you don't notice some changes! I want to show you guys how to prepare healthy meals that are easy to mix and match and put together to keep you on top of your day to day goals. Meals that leave you satisfied and that you can look forward to. Then, when you decide to have a few slices of pizza you'll know that you earned it and you'll know that it won't cause you to veer off course. The course being health, happiness and balance! Okay, here is the recipe. Feel free to make it your own. Mix and match it with other recipes. In fact, when I make meals like this I will often make a batch of vegetables, a batch of a few different proteins, some potatoes, some rice. That way I can reach into my fridge and create a new meal every time. Keep in mind this recipe yields 4 portions. Nutrition InformationEntire meal=1944 calories Portion size=486 calories
For the ChickenIngredients 1 lb boneless skinless chicken thighs 2 T soy sauce 3 T olive oil Salt & Pepper to taste For the Green BeansIngredients 1 lb green beans, trimmed 1T salt (to boil water) 2-3 cloves fresh garlic, minced 1 T fresh ginger, minced 1/4 small onion, minced 1/2 T soy sauce 1/2 T sesame oil For the CouscousIngredients 1.5 cup dried Moroccan Couscous (fine grain) 2 cup chicken stock (or water) 1/2 T olive oil 2 tsp turmeric 1 tsp granulated garlic 1 tsp curry powder 1-2 stalk green onion, sliced 1/4' pieces *Note: You can buy easy to make couscous boxes at the grocery store. Near East is my favorite brand that comes in lots of different flavors. Just add water or chicken stock and it's ready in 5 minutes! Method1. Start by taking your chicken out and letting it come to room temperature. While you do this, go ahead and bring a pot of salted water to a boil (1 T salt).
2. While your chicken is coming to temperature and your water is getting hot, rinse and trim your green beans so they are ready to go. 3. Once your green beans are cleaned and trimmed, prep your onion, ginger and garlic. You just want to mince or finely chop these ingredients. The size and uniformity doesn't matter too much. 4. By this point your water should be boiling. Before throwing your green beans in, set yourself up with colander in the sink. Now, boil the green beans for no more than 2 minutes. The goal here is to cook them just enough that they are no longer raw but remain vibrant and still have a nice crunch. 5. After 2 minutes, strain the green beans in a colander and rinse with cold water. Alternately, you could transfer them into an ice water bath, but if you follow the 2-min rule then this step is unnecessary. 6. While your green beans are draining and cooling, move onto cleaning the chicken. Start by patting the chicken very dry. Trim any excess fat and season lightly with salt and pepper. You don't want to add too much salt because we'll be marinating in soy sauce which will add some saltiness. 7. Cut your seasoned chicken into 1" pieces and transfer to a bowl. Add the soy sauce and olive oil (or any oil you have) and toss to coat. Let the mixture marinate for a few minutes. 7. While the chicken is marinating, take this opportunity to clean all work surfaces and utensils used for the chicken very well. Cross contamination is no joke!! 8. We'll come back to the chicken and green beans in a minute. Now, we'll start the couscous. If using a box, go ahead and follow the instructions. Otherwise, boil the chicken stock in a small pot. Once the liquid has come to a boil, add the couscous along with the seasonings, green onions and oil. Mix well and as soon as the mixture comes to a boil, turn the heat off and cover with a lid. Set a timer for 5-7 minutes. After the timer goes off, fluff your couscous with a fork and it's ready to go! 9. Now bring a saute pan to high heat. Once you see a slight smoke coming off from the pan, add your marinated chicken. Arrange in a single layer on the pan and cook on each side for about 3-4 minutes until a crust is formed. You want the pan hot but you don't want to burn the chicken. Be sure to control your temperature. If the pan is too hot, lower it to medium. 10. Once your chicken is cooked through (about 8-10) minutes remove the chicken and set aside but keep your pan hot. 11. Add the soy sauce and sesame oil to your hot saute pan and throw in the onion, ginger and garlic. Saute for about 2 minutes on medium/high heat and then add the green beans. Toss mixture for another 2-3 minutes and serve! 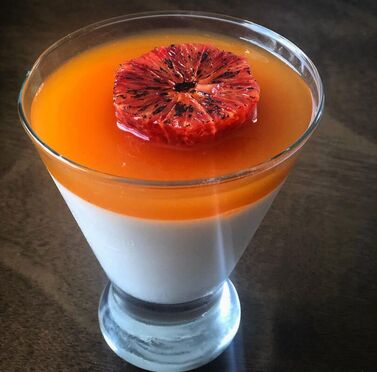 Panna Cotta is one of those desserts that is deceivingly easy to put together. With just a few ingredients you can make a restaurant quality dessert that is sure to impress your friends, your mother in law, your boss, anyone! This gelatin-set dessert is popping up more and more recently and is so popular because it is versatile, light, simple and super tasty. You can make it as sweet or mild as you like and utilize whatever ingredients you have at your disposal. The only caveat to making this dessert is that you have to prepare it in advance. So, if you are a procrastinator, this one might take a little extra planning. (But I believe in you!) The trick with Panna Cotta is incorporating the right amount of gelatin. Too much, and your dessert will be stiff; Too little and it won’t set. Then, you will have to allow the dessert 4-6 hours to set in the fridge. The next step will be to make your fruit gelee (aka jelly). This mixture is poured over your Panna Cotta and also needs an additional 4-6 hours to cool and set. Start this recipe a day in advance and you will be just fine. Gelee, as the name suggests, is a fruit juice or puree that is thickened with gelatin and offers an amazing contrast in flavor and texture to your Panna Cotta. While the Panna Cotta is rich and creamy, the Gelee is smooth and tart, providing the perfect balance for a well rounded dessert. In this recipe, we'll make a vanilla flavored Panna Cotta topped with a Passion Fruit Gelee and garnished with Brulee Blood Orange. Here is what you will need: Vanilla Panna CottaIngredients 1 cup heavy cream 1 cup buttermilk (or whole milk) 1/3 cup granulated sugar 2 tsp granulated gelatin 1/4 tsp salt 1.5 tsp vanilla (feel free to add a vanilla bean pod to the mix!) Method
Passionfruit GeleeIngredients 1 cup of Passion Fruit puree (or any puree or juice of your choice!) Juice of 1 lime, strained 3/4 tsp gelatin Method
*Note: To cool your mixture quickly, use an ice bath. To do this you will need two containers. A smaller one that contains your hot mixture and a larger one that you will fill with water and ice. Place your smaller container into the larger one and whisk your hot mixture until it cools to the desired temperature. Keep in mind that metal containers will cool much faster than plastic, but any will do.**The way you chose to garnish this dessert is totally up to you and the possibilities are endless! In this recipe I chose Blood Orange because I think the flavor compliments the other components well and the fruit is in season meaning that it is at its peak in freshness and flavor. I simply remove the skin, slice the citrus in rounds and sprinkle with a light dusting of granulated sugar. I then use a blow torch to brulee the top and place it over top the gelee when it is about 2 hours into it's setting process. By waiting a few hours the fruit sinks just slightly into the Gelee. If you checked out my Lechon recipe then perhaps you found yourself here. Whatever the reason, welcome! I want to share with you a classic Cuban marinade and sauce that is super versatile and easy to prepare. If you plan on making my Lechon recipe, then you can use this Mojo sauce to mix right into your pork. The acid from the limes cuts through the fattiness of the pork, making it a perfect pair. Like most of my recipes, you will only need a few ingredients. You probably have these ingredients in your home already. You will need limes, garlic, red onion, olive oil and salt. Traditionally, Mojo is made with naranja agria, meaning sour orange. This ingredient is not readily available however, and can be easily swapped with limes. The most important part of this recipe is that you squeeze fresh lime juice. The bottled stuff truly pales in comparison. The rest of the prep is very simple. You will need to slice your red onion; I like to slice the onion in rounds but you can slice however you like. If you have a mandolin you can easily achieve uniform slices, about ¼ to ½ of an inch is fine. The thickness is really according to your preference. Next, you will need to peel your garlic and leave it whole. To bring all the components together you will start by heating the olive oil over a medium flame or temperature. Then, brown your whole garlic cloves until golden, being careful not to over-brown or burn. This can happen quickly so be mindful and control the heat. Once the garlic is golden you will remove it. At this point you have flavored your oil with garlic which makes for a pretty awesome base. This next step is not necessary, nor is it traditional, but I like to mince the cooked garlic and reincorporate it later. Now you will turn off the heat and pour in the lime juice. Please use caution as the water content of the lime juice mixed with the hot oil will result in some spatter. Allow the oil to cool for a few minutes before adding the juice. At this point you will add the onions and reserved garlic and cook over low heat until the onions are softened and light pink, about 5 minutes. Season with salt to taste and save for later to pour all over the Lechon Asado. Alternatively, you can cool this mixture and use it as a marinade for chicken, steak, fish, anything! Mojo Sauce & MarinadeIngredients 1 large red onion, sliced into 1/4 inch rounds 4 cloves of garlic, peeled ¾ cup lime juice, fresh 1 cup olive oil Salt to taste Method
As always, try this recipe out and let me know what you think!
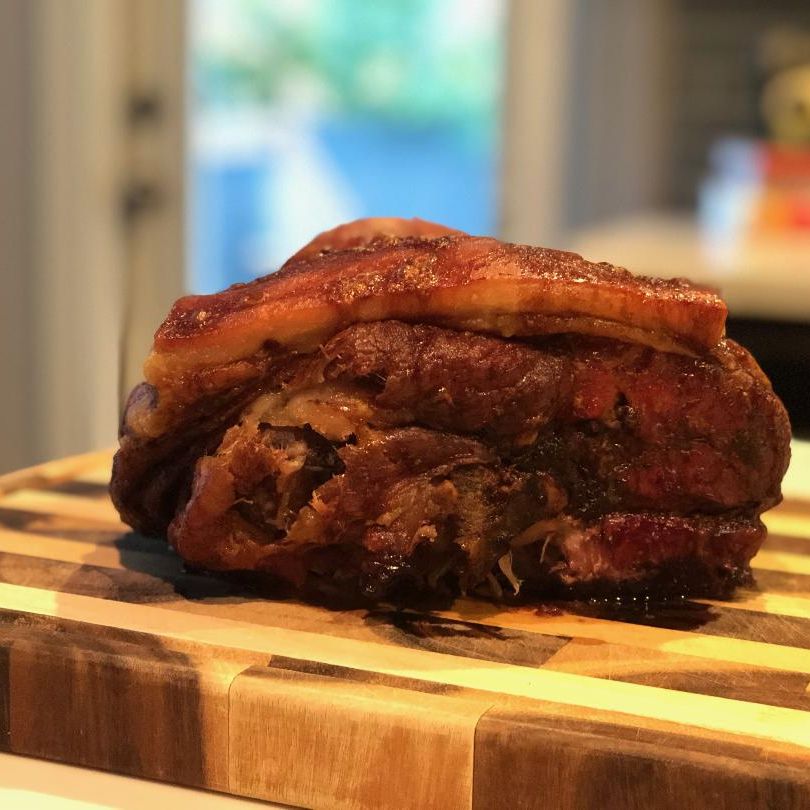
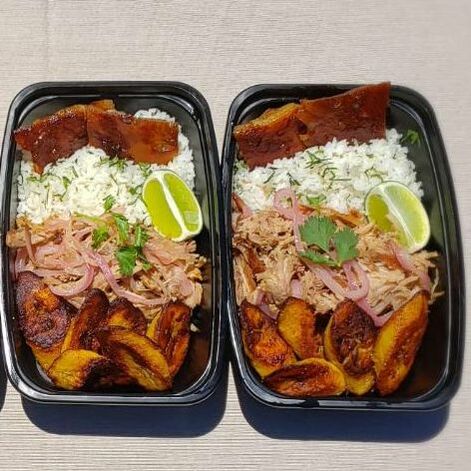
What is Lechon? Ask a Cuban, a Filipino, and an Indonesian and you will probably get different answers. Where was it originated? I voluntarily opt out of that argument! What I am sure of is the common ground of this traditional dish, which is slow roasted pork with delicious crispy skin. Cubans, and most Latin cultures, call this crispy skin chicharron, or as I like to call it, pork candy! This recipe is going to blow your mind in its simplicity. There are only two ingredients. Pork and salt. That’s it. The magic happens in its preparation. I want to address what cut of pork to buy for the best result. In order to get that delicious crispy skin, you will have to purchase a cut of meat where the skin hasn’t been cleaned off. I use a bone-in pork shoulder, also referred to as “picnic-shoulder.” I know it's a little confusing, but if you didn't know, now you know. So remember, bone=flavor and skin=chicharron. The only issue with that, and I use the word issue lightly, is that the pork shoulder cut tends to be quite large. So be prepared to serve this dish at a dinner party or family gathering. OK! Enough talking, let’s get to it. You know the expression, “All good things come to those who wait?” This expression applies directly to our situation. The pork will take around 6 hours to cook. So we’ll start by setting the oven to 350F. Then you will prepare the pork by patting it dry with paper towels. You will then proceed to pierce the entire surface area with a sharp knife. Be generous with the punctures and be sure to use caution. Remember, there is a bone in there that can be potentially dangerous if you jam your knife into it. Once you’ve made many piercings around the whole cut of meat you will generously salt all sides and crevices. I want to stress this again, you will salt the pork just a little more than you are comfortable with. Remember this is a large cut of meat and the salt you apply on the outside will essentially season the inside as well. I don’t have an exact measurement for you as it depends on the size of the pork shoulder. Picture the way a dry rub is applied to a cut of meat when being prepared to smoke. At this point, the prep is done! Place your pierced and seasoned hunk of meat into an aluminum pan that is big enough to allow some room for the juices to flow. You may also want to place a sheet tray underneath that will help support the aluminum pan when you take it out of the oven. Roast that bad boy for 6 hours and allow enough time to cool. It’s done if you can easily remove the bone. Check out my Instagram for an example of what that looks like! Once you’ve let the roast rest for about 30 minutes you can remove the crispy skin layer and cut into bite sized pieces with kitchen shears. All that’s left is pull the meat apart and enjoy! The juices and natural oils released while cooking are sufficient sauce and flavor. However, If you want to kick it up a notch, and enjoy this dish in the traditional Cuban style, check out my Mojo recipe for a simple and delicious sauce. Slow Roasted PorkIngredients 1 ea Bone-in pork shoulder "Picnic Shoulder" Lots of salt Disposable aluminum tray for roasting Method
Don't forget to check out my Mojo recipe for a super easy and delicious sauce. As always, share your results in the comments! 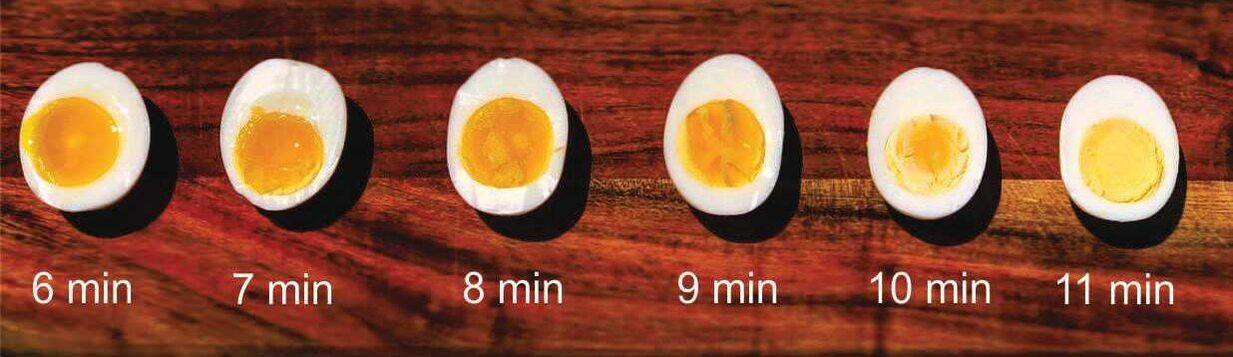 I’ve been getting tons of messages asking about how to achieve the perfect boiled egg… Just kidding. Literally no one has asked me that. But here it is anyway! The guide you never asked for but you need in your life. In this blog post I am going to address a couple of FAQ’s. Ok, let’s begin. I believe there is an application for all varieties of boiled eggs and their degree of “doneness.” Whether you want a super runny egg for dipping toast, a jammy egg for ramen, a soft boiled egg for egg salad, or a hard-boiled egg for deviled delights (I prefer soft boiled eggs for this actually!) this method of boiling eggs will help you to achieve exactly what your aiming for. Question 1: How do I prevent the shell from cracking and egg white seeping out during cooking? There are two things you can do to prevent the shell from cracking. The first is to allow your eggs to come to room temperature before cooking. This will prevent temperature shock which often results in cracking. The second thing you can do is introduce a small amount of vinegar to your water. Don’t worry, the eggs will not take on a vinegary flavor. Question 2: What is the best way to peel the egg easily? There are a few factors that come into play that can determine the difficulty of peeling your cooked egg. First of all, fresh eggs are the enemy of peeling. Without getting too scientific, I will say that the egg shell is made of calcium carbonate; eggs that are fresh have a lower PH making it more difficult to break down the shell so the membrane tends to stick to the white. Eggs that are around a week old have a higher PH which breaks down the shell, making is easier to cook. Harold McGee’s “On Food & Cooking” is an incredible food science book that explains this in great detail. Alternatively, you can control the PH yourself by adding a bit of salt to the cooking water. This too, will help with peeling. Some recipes call for baking soda but I don’t think it’s necessary, plus it leaves behind a sulfur taste if you use too much. Lastly, and in my opinion, the most important, start your eggs in boiling water! I know, this is contrary to popular belief, but trust me. This works! Which brings me to my next point. Question 3: Hot water or cold water? We’ve already taken our eggs out to come to room temperature. Now I want to address the hot water method. Starting your eggs in hot water does a few things. First of all, it sets the white of the egg much quicker which will ultimately help you when peeling, as opposed to starting in cold water which will result in a much slower set and cause the membrane and white to stick together. Additionally, starting your eggs in boiling water eliminates heating variables over which you have no control, (e.g. how long it takes for the water to boil, heating conduction, type of pot being used, etc.) Starting the eggs in boiling water allows for a consistent result that is measurable. Question 4: How long do I cook the egg? Using the method and tips that I have outlined will allow you to achieve the exact egg that you are looking for. Because you are starting the eggs in boiling water, the white will be set and all you have to do is set your timer to control how runny or set you want the yolk to be. Follow the method below to find out how long to cook your eggs. The Perfect Boiled EggIngredients Eggs (However many you’d like!) Water (Enough to cover your eggs by an inch) 1T Vinegar (Any vinegar will do but red may leave a tint) 1T Salt Method
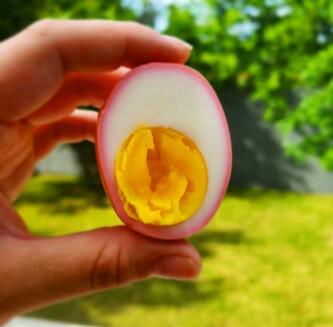
The eggs you see pictured here were left in the solution for 4 hours. This resulted in a light pink exterior and a thin pink ring inside once cut open. My plan for the future is to test the egg color every 3 hours until they’ve soaked for a full day, so those pictures and a follow up blog will be coming soon. Today I’m going to share how to get a perfect soft boiled egg that is easy to peel as well as a light pink color that is both aesthetically pleasing and delicious! First things first. Take 6-8 eggs out and let them come to room temperature. Now we will make our beet liquid. As I mentioned before, I don’t love the pickled egg taste. So instead of making a pickling liquid, I simply boil beets in water. Take 3 medium beets, cut them in half, cover them with just enough water to submerge them, then bring them to a boil and continue to cook until tender. Usually, I would not cut the beets in half so they do not lose their color internally. In this case, however, we want the color to seep into the liquid. Once the beets are tender, strain the liquid and cool in the fridge or freezer. Once the beet liquid is cooled, it’s time to start your eggs. Contrary to popular belief, I like to boil my eggs in water that is already at boiling temp. This allows you to control the softness of the yolk and ensures a white that is set. Also, I have found, that they are much easier to peel this way! Bring a pot of water to a boil with a dash of white vinegar. Your eggs should be room temperature at this point. Once the water is boiling, turn it down for a few moments while you submerge your eggs with a slotted spoon. Then return the water to a boil and set your timer for 9 minutes. After 9 minutes put your eggs into ice cold water until they are cool enough to handle. *For a soft boiled egg guide, see my boiled egg how-to recipe* Now that your eggs are cool enough to handle it’s time to peel them and put them into your beet liquid. Peel your eggs and put them into an airtight container in the beet liquid. For results like mine, leave them for 4 hours before removing and enjoying. If you’d like to see more pink, leave them for longer! Beet-Dyed Soft Boiled EggsIngredients Beet Liquid 3 medium beets Water, enough to cover beets by 1” Boiled Eggs 6-8 eggs, room temperature 1T white vinegar Method
Enjoy! Try this recipe and let me know how it turn out. Please share your variations and finding! Until next time….
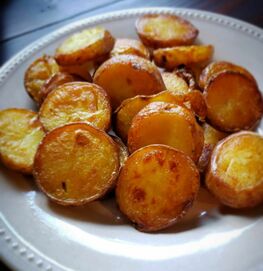
Now before we into the method, let’s talk about the ingredients. Most importantly, the potato. This recipe calls for Yukon Gold because of its medium moisture and starch content. Choosing the right potato for the job makes all the difference here guys. A Russet potato for example, is great for mashing or baking because of its low moisture and high starch content. But you wouldn’t use this type of potato roasting because it is mealy and will likely fall apart. High moisture and low starch potatoes, such as the red and fingerling varieties are great for things like potato salad and roasted potatoes because they keep their shape and can stand up to higher cooking temperatures. The Yukon Gold potato is somewhere in between the two which makes it perfect for the combination cooking method that I will explain below. Melt-In-Your-Mouth Roasted PotatoesIngredients 3lbs Yukon Gold Potato, washed, skin on 1-1.5C Peanut Oil Salt to taste Method
Notes:
1. I chose to use peanut oil because of its high smoke point. This means that the oil won’t burn when brought to a high cooking temperature. You can use an oil of your choice, so long as it has a high smoke point. For more information on what types of oil to use, I have found this article very helpful, Cooking Oils. 2. I have found that in my oven, 425F is a little too low and 450F is a little too high. That is how I came up with 435F. All ovens are not created equally, so keep an eye on them! If after the first 15 minutes your potatoes aren’t crisping up, adjust your temperature a little higher and vise versa. Another factor to consider is how big or small you cut the potatoes. Smaller cuts need a slightly lower heat and vise versa! Play around with it and make it your own! If you decide to add seasoning or herbs do so during the second half of cooking so they don’t burn. |
AuthorHi Kitchen Warriors! I'm Chef Mona. This is where you can find some of my favorite recipes and check out some secret tips and tricks! Archives
December 2019
Categories |

 RSS Feed