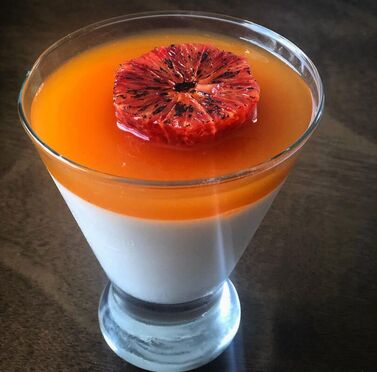
 Panna Cotta is one of those desserts that is deceivingly easy to put together. With just a few ingredients you can make a restaurant quality dessert that is sure to impress your friends, your mother in law, your boss, anyone! This gelatin-set dessert is popping up more and more recently and is so popular because it is versatile, light, simple and super tasty. You can make it as sweet or mild as you like and utilize whatever ingredients you have at your disposal. The only caveat to making this dessert is that you have to prepare it in advance. So, if you are a procrastinator, this one might take a little extra planning. (But I believe in you!) The trick with Panna Cotta is incorporating the right amount of gelatin. Too much, and your dessert will be stiff; Too little and it won’t set. Then, you will have to allow the dessert 4-6 hours to set in the fridge. The next step will be to make your fruit gelee (aka jelly). This mixture is poured over your Panna Cotta and also needs an additional 4-6 hours to cool and set. Start this recipe a day in advance and you will be just fine. Gelee, as the name suggests, is a fruit juice or puree that is thickened with gelatin and offers an amazing contrast in flavor and texture to your Panna Cotta. While the Panna Cotta is rich and creamy, the Gelee is smooth and tart, providing the perfect balance for a well rounded dessert. In this recipe, we'll make a vanilla flavored Panna Cotta topped with a Passion Fruit Gelee and garnished with Brulee Blood Orange. Here is what you will need: Vanilla Panna CottaIngredients 1 cup heavy cream 1 cup buttermilk (or whole milk) 1/3 cup granulated sugar 2 tsp granulated gelatin 1/4 tsp salt 1.5 tsp vanilla (feel free to add a vanilla bean pod to the mix!) Method
Passionfruit GeleeIngredients 1 cup of Passion Fruit puree (or any puree or juice of your choice!) Juice of 1 lime, strained 3/4 tsp gelatin Method
*Note: To cool your mixture quickly, use an ice bath. To do this you will need two containers. A smaller one that contains your hot mixture and a larger one that you will fill with water and ice. Place your smaller container into the larger one and whisk your hot mixture until it cools to the desired temperature. Keep in mind that metal containers will cool much faster than plastic, but any will do.**The way you chose to garnish this dessert is totally up to you and the possibilities are endless! In this recipe I chose Blood Orange because I think the flavor compliments the other components well and the fruit is in season meaning that it is at its peak in freshness and flavor. I simply remove the skin, slice the citrus in rounds and sprinkle with a light dusting of granulated sugar. I then use a blow torch to brulee the top and place it over top the gelee when it is about 2 hours into it's setting process. By waiting a few hours the fruit sinks just slightly into the Gelee.
1 Comment
|
AuthorHi Kitchen Warriors! I'm Chef Mona. This is where you can find some of my favorite recipes and check out some secret tips and tricks! Archives
December 2019
Categories |
 RSS Feed