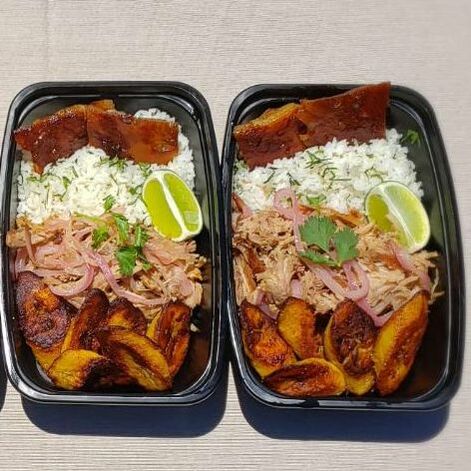
 If you checked out my Lechon recipe then perhaps you found yourself here. Whatever the reason, welcome! I want to share with you a classic Cuban marinade and sauce that is super versatile and easy to prepare. If you plan on making my Lechon recipe, then you can use this Mojo sauce to mix right into your pork. The acid from the limes cuts through the fattiness of the pork, making it a perfect pair. Like most of my recipes, you will only need a few ingredients. You probably have these ingredients in your home already. You will need limes, garlic, red onion, olive oil and salt. Traditionally, Mojo is made with naranja agria, meaning sour orange. This ingredient is not readily available however, and can be easily swapped with limes. The most important part of this recipe is that you squeeze fresh lime juice. The bottled stuff truly pales in comparison. The rest of the prep is very simple. You will need to slice your red onion; I like to slice the onion in rounds but you can slice however you like. If you have a mandolin you can easily achieve uniform slices, about ¼ to ½ of an inch is fine. The thickness is really according to your preference. Next, you will need to peel your garlic and leave it whole. To bring all the components together you will start by heating the olive oil over a medium flame or temperature. Then, brown your whole garlic cloves until golden, being careful not to over-brown or burn. This can happen quickly so be mindful and control the heat. Once the garlic is golden you will remove it. At this point you have flavored your oil with garlic which makes for a pretty awesome base. This next step is not necessary, nor is it traditional, but I like to mince the cooked garlic and reincorporate it later. Now you will turn off the heat and pour in the lime juice. Please use caution as the water content of the lime juice mixed with the hot oil will result in some spatter. Allow the oil to cool for a few minutes before adding the juice. At this point you will add the onions and reserved garlic and cook over low heat until the onions are softened and light pink, about 5 minutes. Season with salt to taste and save for later to pour all over the Lechon Asado. Alternatively, you can cool this mixture and use it as a marinade for chicken, steak, fish, anything! Mojo Sauce & MarinadeIngredients 1 large red onion, sliced into 1/4 inch rounds 4 cloves of garlic, peeled ¾ cup lime juice, fresh 1 cup olive oil Salt to taste Method
As always, try this recipe out and let me know what you think!
1 Comment
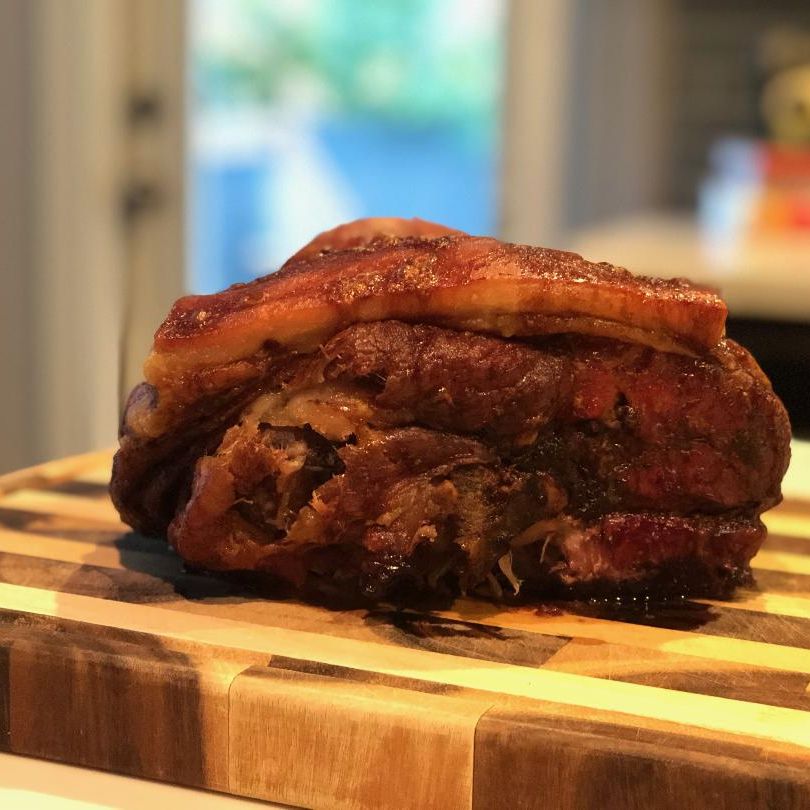
What is Lechon? Ask a Cuban, a Filipino, and an Indonesian and you will probably get different answers. Where was it originated? I voluntarily opt out of that argument! What I am sure of is the common ground of this traditional dish, which is slow roasted pork with delicious crispy skin. Cubans, and most Latin cultures, call this crispy skin chicharron, or as I like to call it, pork candy! This recipe is going to blow your mind in its simplicity. There are only two ingredients. Pork and salt. That’s it. The magic happens in its preparation. I want to address what cut of pork to buy for the best result. In order to get that delicious crispy skin, you will have to purchase a cut of meat where the skin hasn’t been cleaned off. I use a bone-in pork shoulder, also referred to as “picnic-shoulder.” I know it's a little confusing, but if you didn't know, now you know. So remember, bone=flavor and skin=chicharron. The only issue with that, and I use the word issue lightly, is that the pork shoulder cut tends to be quite large. So be prepared to serve this dish at a dinner party or family gathering. OK! Enough talking, let’s get to it. You know the expression, “All good things come to those who wait?” This expression applies directly to our situation. The pork will take around 6 hours to cook. So we’ll start by setting the oven to 350F. Then you will prepare the pork by patting it dry with paper towels. You will then proceed to pierce the entire surface area with a sharp knife. Be generous with the punctures and be sure to use caution. Remember, there is a bone in there that can be potentially dangerous if you jam your knife into it. Once you’ve made many piercings around the whole cut of meat you will generously salt all sides and crevices. I want to stress this again, you will salt the pork just a little more than you are comfortable with. Remember this is a large cut of meat and the salt you apply on the outside will essentially season the inside as well. I don’t have an exact measurement for you as it depends on the size of the pork shoulder. Picture the way a dry rub is applied to a cut of meat when being prepared to smoke. At this point, the prep is done! Place your pierced and seasoned hunk of meat into an aluminum pan that is big enough to allow some room for the juices to flow. You may also want to place a sheet tray underneath that will help support the aluminum pan when you take it out of the oven. Roast that bad boy for 6 hours and allow enough time to cool. It’s done if you can easily remove the bone. Check out my Instagram for an example of what that looks like! Once you’ve let the roast rest for about 30 minutes you can remove the crispy skin layer and cut into bite sized pieces with kitchen shears. All that’s left is pull the meat apart and enjoy! The juices and natural oils released while cooking are sufficient sauce and flavor. However, If you want to kick it up a notch, and enjoy this dish in the traditional Cuban style, check out my Mojo recipe for a simple and delicious sauce. Slow Roasted PorkIngredients 1 ea Bone-in pork shoulder "Picnic Shoulder" Lots of salt Disposable aluminum tray for roasting Method
Don't forget to check out my Mojo recipe for a super easy and delicious sauce. As always, share your results in the comments! 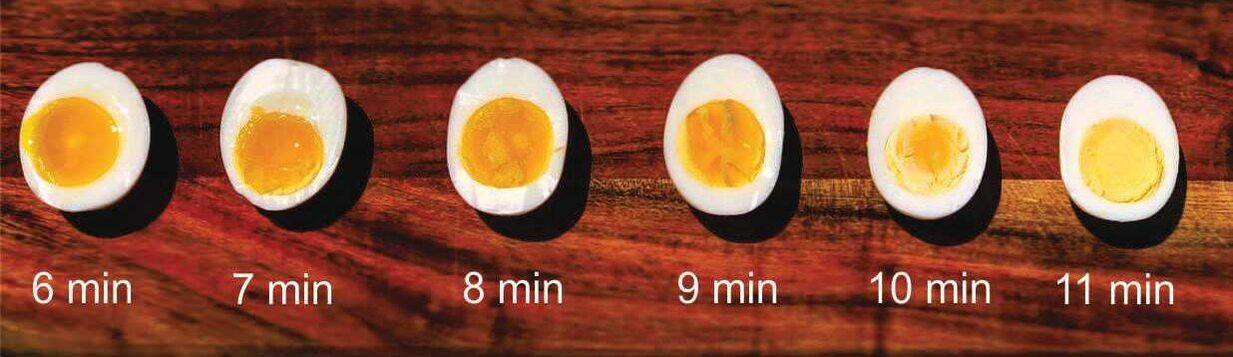 I’ve been getting tons of messages asking about how to achieve the perfect boiled egg… Just kidding. Literally no one has asked me that. But here it is anyway! The guide you never asked for but you need in your life. In this blog post I am going to address a couple of FAQ’s. Ok, let’s begin. I believe there is an application for all varieties of boiled eggs and their degree of “doneness.” Whether you want a super runny egg for dipping toast, a jammy egg for ramen, a soft boiled egg for egg salad, or a hard-boiled egg for deviled delights (I prefer soft boiled eggs for this actually!) this method of boiling eggs will help you to achieve exactly what your aiming for. Question 1: How do I prevent the shell from cracking and egg white seeping out during cooking? There are two things you can do to prevent the shell from cracking. The first is to allow your eggs to come to room temperature before cooking. This will prevent temperature shock which often results in cracking. The second thing you can do is introduce a small amount of vinegar to your water. Don’t worry, the eggs will not take on a vinegary flavor. Question 2: What is the best way to peel the egg easily? There are a few factors that come into play that can determine the difficulty of peeling your cooked egg. First of all, fresh eggs are the enemy of peeling. Without getting too scientific, I will say that the egg shell is made of calcium carbonate; eggs that are fresh have a lower PH making it more difficult to break down the shell so the membrane tends to stick to the white. Eggs that are around a week old have a higher PH which breaks down the shell, making is easier to cook. Harold McGee’s “On Food & Cooking” is an incredible food science book that explains this in great detail. Alternatively, you can control the PH yourself by adding a bit of salt to the cooking water. This too, will help with peeling. Some recipes call for baking soda but I don’t think it’s necessary, plus it leaves behind a sulfur taste if you use too much. Lastly, and in my opinion, the most important, start your eggs in boiling water! I know, this is contrary to popular belief, but trust me. This works! Which brings me to my next point. Question 3: Hot water or cold water? We’ve already taken our eggs out to come to room temperature. Now I want to address the hot water method. Starting your eggs in hot water does a few things. First of all, it sets the white of the egg much quicker which will ultimately help you when peeling, as opposed to starting in cold water which will result in a much slower set and cause the membrane and white to stick together. Additionally, starting your eggs in boiling water eliminates heating variables over which you have no control, (e.g. how long it takes for the water to boil, heating conduction, type of pot being used, etc.) Starting the eggs in boiling water allows for a consistent result that is measurable. Question 4: How long do I cook the egg? Using the method and tips that I have outlined will allow you to achieve the exact egg that you are looking for. Because you are starting the eggs in boiling water, the white will be set and all you have to do is set your timer to control how runny or set you want the yolk to be. Follow the method below to find out how long to cook your eggs. The Perfect Boiled EggIngredients Eggs (However many you’d like!) Water (Enough to cover your eggs by an inch) 1T Vinegar (Any vinegar will do but red may leave a tint) 1T Salt Method
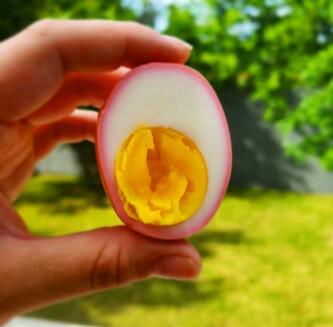
The eggs you see pictured here were left in the solution for 4 hours. This resulted in a light pink exterior and a thin pink ring inside once cut open. My plan for the future is to test the egg color every 3 hours until they’ve soaked for a full day, so those pictures and a follow up blog will be coming soon. Today I’m going to share how to get a perfect soft boiled egg that is easy to peel as well as a light pink color that is both aesthetically pleasing and delicious! First things first. Take 6-8 eggs out and let them come to room temperature. Now we will make our beet liquid. As I mentioned before, I don’t love the pickled egg taste. So instead of making a pickling liquid, I simply boil beets in water. Take 3 medium beets, cut them in half, cover them with just enough water to submerge them, then bring them to a boil and continue to cook until tender. Usually, I would not cut the beets in half so they do not lose their color internally. In this case, however, we want the color to seep into the liquid. Once the beets are tender, strain the liquid and cool in the fridge or freezer. Once the beet liquid is cooled, it’s time to start your eggs. Contrary to popular belief, I like to boil my eggs in water that is already at boiling temp. This allows you to control the softness of the yolk and ensures a white that is set. Also, I have found, that they are much easier to peel this way! Bring a pot of water to a boil with a dash of white vinegar. Your eggs should be room temperature at this point. Once the water is boiling, turn it down for a few moments while you submerge your eggs with a slotted spoon. Then return the water to a boil and set your timer for 9 minutes. After 9 minutes put your eggs into ice cold water until they are cool enough to handle. *For a soft boiled egg guide, see my boiled egg how-to recipe* Now that your eggs are cool enough to handle it’s time to peel them and put them into your beet liquid. Peel your eggs and put them into an airtight container in the beet liquid. For results like mine, leave them for 4 hours before removing and enjoying. If you’d like to see more pink, leave them for longer! Beet-Dyed Soft Boiled EggsIngredients Beet Liquid 3 medium beets Water, enough to cover beets by 1” Boiled Eggs 6-8 eggs, room temperature 1T white vinegar Method
Enjoy! Try this recipe and let me know how it turn out. Please share your variations and finding! Until next time….
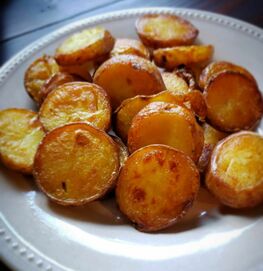
Now before we into the method, let’s talk about the ingredients. Most importantly, the potato. This recipe calls for Yukon Gold because of its medium moisture and starch content. Choosing the right potato for the job makes all the difference here guys. A Russet potato for example, is great for mashing or baking because of its low moisture and high starch content. But you wouldn’t use this type of potato roasting because it is mealy and will likely fall apart. High moisture and low starch potatoes, such as the red and fingerling varieties are great for things like potato salad and roasted potatoes because they keep their shape and can stand up to higher cooking temperatures. The Yukon Gold potato is somewhere in between the two which makes it perfect for the combination cooking method that I will explain below. Melt-In-Your-Mouth Roasted PotatoesIngredients 3lbs Yukon Gold Potato, washed, skin on 1-1.5C Peanut Oil Salt to taste Method
Notes:
1. I chose to use peanut oil because of its high smoke point. This means that the oil won’t burn when brought to a high cooking temperature. You can use an oil of your choice, so long as it has a high smoke point. For more information on what types of oil to use, I have found this article very helpful, Cooking Oils. 2. I have found that in my oven, 425F is a little too low and 450F is a little too high. That is how I came up with 435F. All ovens are not created equally, so keep an eye on them! If after the first 15 minutes your potatoes aren’t crisping up, adjust your temperature a little higher and vise versa. Another factor to consider is how big or small you cut the potatoes. Smaller cuts need a slightly lower heat and vise versa! Play around with it and make it your own! If you decide to add seasoning or herbs do so during the second half of cooking so they don’t burn. |
AuthorHi Kitchen Warriors! I'm Chef Mona. This is where you can find some of my favorite recipes and check out some secret tips and tricks! Archives
December 2019
Categories |

 RSS Feed